Friday, December 23, 2011

Have Yourself A ReinBEER!


For this project I used some beers in the fridge, googly eyes, mini red pom poms, brown pipe cleaners, and a hot glue gun. It'd be a fun crafting session with kiddos and Root Reinbeers, don't you think?

Now that the presents are wrapped and the goodies have been baked, I'm looking forward to unplugging all my devices and just enjoying some R&R (Rest and Reinbeers) this Christmas. Before I bid you adieu, I wanted to wish everyone a wonderful Holiday and to be especially appreciative of everything and everyone! 


Merry Christmas Eve Eve! :o)
Margaret

Tuesday, December 13, 2011

Snow Nice to Eat You

PEOPLE WHO SAY "I don't eat sweets" don't make sense to me. It doesn't make me think they're better or healthier or that they have more self control. It actually makes me feel sorry for them because they don't seem like happy people. And because I love desserts. They're good when I wake up, they're good supplements to my meal, and they're especially good right before I pass out in my bed. 

The smallest nibble of a cookie or mouthful of cake can comfort me when no thought, person, event, or form of therapy can. I've seen people who seem like they would never be friends smile over a cupcake, which makes me wonder... why do people even act like peace isn't possible? And these people who allegedly do not eat sweets, do they know what they're missing?

As you might be able to guess, I had a craving one week and a perfect occasion not to gobble them up all by myself. I made some chocolate cupcakes and used festive Christmas toppers I received last year to adorn them. Dust on some powdered sugar and voila!—snow wonder they're so cute, right? It's like staring at a miniature Winter Wonderland.


Pine and dandy Christmas cupcakes.

INGREDIENTS
  • 1 cup all-purpose flour
  • 1/3 cup cocoa powder
  • 1/4 cup butter, slightly softened
  • 2 eggs
  • 1 tsp. baking soda
  • 1/8 tsp. salt
  • 1/2 cup white sugar
  • 1 tsp. vanilla
  • 1/2 cup low-fat buttermilk
  • powdered sugar for dusting


DIRECTIONS
  1. Mix dry ingredients: flour, cocoa, baking soda and salt.
  2. Combine butter and sugar with a mixer at medium speed for 4 minutes. Add eggs and vanilla, then alternately add dry mixture and buttermilk to sugar and butter mixture.
  3. Bake at 350° for 17 minutes, then remove from oven and cool for 5 minutes. Lightly sprinkle powdered sugar (I like to use a tea strainer for this if you don't own a sugar duster) over cooled cupcakes. Yields 12 cupcakes. The "snow" may "melt" a little so it might work better if you spread some buttercream frosting on them first.
Happy Feasting!
Margaret

Monday, November 28, 2011

Art Attack

FIRST OFF, I'd like to say that I did try to resist Black Friday shopping—which I'll have you know I did quite successfully. I didn't wake up any earlier than my body wanted to, I didn't go into stores or e-shop any of the sales that tantalized me from my inbox. The best part is, instead of ensconcing myself in the hysteria I picked up a few things to support my latest art addiction and gathered ideas for everyone on my Christmas list in the process.


MARY HEUSSENSTAMM
Mary Heussenstamm's career began in nursing, but she always had an interest in art and frequently sketched pencil drawings of her patients. Upon her retirement at the age of 59, she began painting watercolors, using multiethnic models on the streets of Los Angeles as subjects. I discovered her book featuring 100 of these watercolor portraits and I immediately knew this collection had to be mine in spite of how pricey it was. I was drawn to her incredible ability to depict the play of light and shadow upon different faces, and the expressions she was able to capture in less than an hour for each portrait. The simple cleanliness of her paintings and her masterful use of color truly left me in awe. Heussenstamm passed away in 2005 from Parkinson's and Alzheimer's disease.


You can purchase the book from Amazon here for $60.


CREWEL EMBROIDERY
As if you needed any more convincing of my centenarian-like qualities, I lately discovered crewel embroidery and want to start using some as artwork in the apartment. Here are some crewel poppies that I am thinking about working on and framing. I don't know about how long it will take or if it will even turn out like the picture, but I might give it a stab. Insights anyone? I am thinking about putting these alongside some vintage postcards and other artwork. Maybe even a small plate or two. I guess we will just have to see how Nick reacts... although let's just say I have a feeling he will be open to other suggestions. ;-)


You can find these already stitched or in kits at flea markets, etsy.com, or eBay.com.


CAVALLINI WRAPPING PAPER
Cavallini carries some of the most gorgeous paper goods, some of my favorite being their line of gift wrapping papers, available from Paper Source here, at $3.95 for a 20" x 28" sheet. Although I think it's a bit steep for that size wrapping paper, I adore them for wall art because they're high quality construction and awesomely-priced as artwork. This one is currently displayed in our kitchen (pictures to come!):


I love that everyone thinks it's an antique! It's now sold out at Paper Source, but they do restock so be on the lookout.


MARIA SIBYLLA MERIAN
Insects of Surinam is a collection of Maria Sibylla Merian's copperplate engravings, detailing phenomena like the metamorphoses of butterflies and the natural habitat of insects in Surinam. In addition to helping lay the foundation for modern entomology, she pioneered travel and exploration for women when she sailed to South America in 1699. The amount of detail in her work is remarkable. We're thinking of hanging a few of these up in our living room (something I think Nick will be much more on board with than floral embroidery).


Available for $26.39 at Amazon here.


xoxo,
Margaret

Wednesday, October 12, 2011

Picnic in the Park

BY A STROKE OF LUCK, the picnic in the park that we threw for my mom's (censored per her request)th birthday took place on the last weekend of clear skies and warm weather. With everything going on in our lives, it's becoming increasingly rare that our whole family can come together and enjoy an afternoon together, so every opportunity is a special one.

This salad was a perfect way to open the meal. I'm sure I'll be making it again soon:


PEACH SALAD INGREDIENTS
  • 1 head butter lettuce
  • 2 yellow peaches, thinly sliced
  • 1 medium-sized red bell pepper, diced
  • 1/2 a head of raddichio
  • pine nuts or coarsely chopped walnuts, whatever you have on hand.
  • crumbled goat cheese
  • balsamic vinegar, olive oil, salt and pepper to taste
  • garlic powder (optional)

And here's an action shot of some cubed butternut squash. Incredibly simple but amazingly hearty.

    WARM BUTTERNUT SQUASH INGREDIENTS
    • 1/2 butternut squash, cut into 1" cubes
    • 2 sprigs of rosemary
    • 1 cup vegetable broth

    Chocolate cake is my mom's absolute lust-have. My sister and I adapted a recipe from Ina Garten. We omitted the buttermilk her original recipe calls for and changed out some ingredients so that it  was less rich for the sake of our health-conscious parents. That may sound blasphemous but really, it was still delicious.


    CHOCOLATE CAKE INGREDIENTS
    • 1 3/4 cups flour
    • 1 1/2 cups sugar
    • 3/4 cup cocoa powder
    • 2 tsp baking soda
    • 1 tsp baking powder
    • 1 tsp salt
    • 1/2 cup vegetable oil
    • 2 eggs
    • 1 tsp vanilla
    • 1 cup freshly brewed hot coffee 

    DIRECTIONS
    1. Sift the dry ingredients into the bowl of an electric mixer on low speed until combined. In a separate bowl, combine the oil, eggs and vanilla.
    2. Using a low speed on the mixer, slowly add the wet ingredients to the dry. Then add the coffee and stir just to combine. Pour the batter into 2 buttered and floured 9" cake pans and bake at 350° for 45-40 minutes. Let cake cool in pans for 30 minutes before removing.


      Cheers to my mum!
      Margaret

      Monday, October 3, 2011

      Turtle-ly Awesome Cupcakes

      MY SWEETHEART of a sister volunteers for an ocean conservation center in San Francisco and wanted to let them eat cake on the last day together. Naturally, a wave of excitement washed over me (pardon the puns... they can't be helped today) and I remembered a Bakerella-inspired turtle cupcake I had seen in the past that would rise to the occasion.

      Sea for yourself (I told you the puns were unstoppable) and read on to learn how to make your own:


      Are these to 'dive' for or what?


      Have fun. :) And be sure to stay tuned for a tour of my new apartment!
      Margaret

      Thursday, August 18, 2011

      Ooo-La-Lingerie Cookies

      BACHELORETTE PARTIES can sometimes mean a never-ending supply of tequila shots, an obscene amount of phallic-shaped party favors, and stuffing dollar bills into a police officer's rippling banana hammock. Fortunately the bride-to-be wanted a low-profile trip to Napa to get some R&R and take time away from the stresses of wedding planning.

      I couldn't attend so I thought it would be nice to send her some bachelorette-appropriate goodies. I enlisted Sherri from Sherri's Sweet Treats (Her cupcakes are unrealfan her Facebook page!) to make some lingerie cookies with me. We used heart-shaped sugar cookies (there are so many types of cookies you can make with them!) royal icing, pearls and non-pareils for all the bows and frills.


      Photo credit unknown.

      We didn't get a chance to snap any pictures of the ones we made, but it takes a little bit of skilled handiwork to get these looking pretty as the ones pictured above. As Sherri and I both discovered, it gets pretty tiring applying pearls individually. We learned some useful lessons along the way:

      • Line your cookie with the shape of whatever you're working on. As a reference, the icing for the outline needs to have a toothpaste-like consistency.
      • Flood your cookie with a thinner, runnier icing than the icing used in the previous step. Use a toothpick to fill in the lines if necessary, or gently shake the cookie to get the icing to settle.
      • Use tweezers to apply the pearls evenly to your cookie while icing is still wet.
      • Start off with just a few colors, and do everything methodically (i.e. line all cookies first, let dry, flood to fill cookie, then decorate with other colors). Royal icing dries fairly quickly so it can be chaotic trying to use a ton of colors without knowing your game plan.
      • Keep a spray bottle handy for spraying into your royal icing to thin (If you don't believe me, then take her word for it! Sweet Sugar Belle, the cookie-decorating goddess, swears by this.)

        Please feel free to leave suggestions you may have; I'd love to hear your input. :)

        Thanks,
        Margaret

        Friday, August 12, 2011

        Vintage Treasures Part Deux!

        BY NOW I had hoped someone would pay me to do their shopping for them, but since I've had no such luck on that front, I am growing increasingly fond of the idea of opening up my own little vintage boutique or vintage housewares/upcycled furniture shop. I love when classic things get a fresh twist! It's also worth mentioning that this flicker of inspiration has been fueled by my late-night Mad Men marathons.

        Here are some things I've bought in the last few months:

        1. Buying secondhand leather shoes is one exception I've made to buying animal products.


        2. Although it appears to be vintage, this dress is from Anthropologie. I couldn't resist scooping it up for—you guessed it!a wedding in September. :o)


        3. This quartz bracelet is currently one of my favorite things! It's made partially from vintage materialseight lemon faceted circular quartz crystal beads and three quartz crystal faceted transparent square beads.


        4. I needed a cute way to store my runaway spare buttons and jewelry. This vintage octagonal shadow box is both functional and pretty. I think shells or rocks (which I also collect) would look nice displayed in a case like this too.


        5. It's probably no surprise, but yellow is one of my favorite accent colors. I love this alarm clock just for decoration; my cell phone works fine as an alarm clock. Plus I just can't resist a good deal!


        1. 1980's Nicole Club Leather Sandals, etsy.com/shop/LapineOurs2. Anthropologie Spiced Dress, anthropologie.com3. Quartz Bracelet, etsy.com/shop/KimDulaney4. Octagon Shadow Box, etsy.com. 5. Vintage Alarm Clock from West Germany, sacantiquefaire.com.

        Speaking of retro gone mainstream, be sure to check out the highly anticipated collaboration between Mad Men Costume Designer Janie Bryant with Banana Republic on BR's 50's-inspired Mad Men Fall collection.

        What are your latest purchases, and would you buy any of BR's Mad Men pieces?
        xo, m


        Thursday, July 21, 2011

        I Do!... Love Buying Bridal Presents.

        COMING BACK from two weddings last weekend to another slew of engagements announced via Facebook and a bridal shower this upcoming weekend means one thing for meshopping! Of course I'll be shopping for presents, but it's almost as rewarding as shopping for myself so I have no complaints.

        While scouting, I realized that the usual suspects have been done to death, so I sought out some more creative options to share with those needing ideas amidst wedding season. I went ahead and bought the diamond ring measuring spoons for a lovely bride-to-be. :-)


        1. Jonathan Adler Mr. and Mrs. Muse Mug, $24. jonathanadler.com2. Snooze City I Heart U Pillowcase Set, $19.99 each. bedbathandbeyond.com. 3. Lover Dovers I Love Lucy Retro Apron, $28.65. etsy.com/shop/loverdoversclothing. 4. Diamond Ring Measuring Spoons, $14.99. perpetualkid.com5. Holly GoNightly Sleep Mask, $14. fredflare.com6. Happ & Stahns Perfumers Eau De Parfum, $68. anthropologie.com.

        Wednesday, June 29, 2011

        Ice Cream, The Gateway Dessert

        ASKING ME TO imagine happiness before ice cream is like asking me to imagine consciousness before coffee. Put the two together and you'll have created a taste of heaven. When Nick was gifted an ice cream machine and I a stand mixer last Christmas, I knew the kitchen gods were smiling down upon us. 

        The combination of desserts dancing in my head have been astronomicalcreamy scoops of gelato tucked into fluffy brioche buns, chocolate pound cake ice cream sandwiches, and cool watermelon bombes for summer.

        Nevertheless, we thought it best to stick to perfecting one flavor at a time, at least initially. I must say that Nick did an amazing job with this recipe! The secret to the coffee ice cream is the Kahlúa and coconut milk. Kahlúa is a coffee-flavored liqueur but does not end up being very strong when used to flavor ice cream. You can also use Bailey's Irish Cream, which tastes lighter than Kahlua, but is not vegan because it contains dairy (if you're not opposed to dairy, go for it, because it is the bomb dot com.)

        I used coconut milk in lieu of heavy cream for vegan ice cream aficionados (dieters be warned: the saturated fat content is alarmingly high even though it's vegan), but the difference in taste is unnoticeable, even to the sophisticated palate. Coconut milk is my preferred alternative for use with very strong flavors that will mask the flavor of coconut; milder flavors like vanilla and pistachio don't work so well.

         photo by Nick Holley


        KAHLUA ICE CREAM INGREDIENTS
        • 13.5 oz full fat coconut milk 
        • 1 1/4 cup plain soy milk 
        • 1/2 cup sugar 
        • 1 tsp. vanilla extract 
        • 3 heaping tablespoons instant coffee 
        • 1/4 cup Kahlúa or Bailey's Irish Cream

        I wish I could jokingly say "please eat responsibly," but the taste of alcohol is virtually unnoticeable in this sweet treat. Regardless, it's probably not something you'd want to give your young ones, especially since it contains caffeine as well.

        Happy Summer,
        MARGARET

        Monday, June 27, 2011

        Perfect Panzanella

        YOU CAN NEVER go wrong with Italian food: red vine-ripened tomatoes, fresh herbs, and a loaf of piping hot bread are tried and true Italian classics. To celebrate the start of summer, I made a refreshing yet hearty Panzanella that is unlike most other salads without meat in how filling it is.


        SALAD INGREDIENTS
        • 4 cups of French bread cut into 1" cubes
        • 1 hothouse cucumber cut into 3/4" slices
        • 2 large tomatoes cut into 1" cubes
        • 1 seeded red bell pepper, cut into 1" cubes
        • 1 seeded yellow bell pepper, cut into 1" cubes
        • 1/2 small red onion, finely diced
        • 15 basil leaves, chopped
        • 2 tablespoons capers
        • grapeseed or olive oil
        • salt and pepper to taste

        VINAIGRETTE INGREDIENTS

        • 1 tsp. spicy Dijon mustard
        • 1 tsp. minced garlic
        • 2 tbsp. apple cider vinegar
        • 1/4 cup olive oil
        • 1/2 tsp. sea salt
        • 1/2 tsp. black pepper

        DIRECTIONS
        1. Heat grapeseed oil in pan, adding cubes of bread and salt and tossing often, for 10 minutes.
        2. Mix tomatoes, cucumber, bell peppers, onion, basil, and capers in a large bowl. Whisk ingredients of vinaigrette, then add it to salad ingredients, and lastly, add toasted bread cubes.


        On a tangent, there are some realizations that I've made in the last few months. As much as I love the fashion industry, I think I owe it to myself to seriously explore the world of culinary art, or more broadly-speaking, design. I often find myself wishing I could offer an unparalleled level of content for food/design-hungry readers but simply not having time to put the energy into such a lofty goal! Transitioning into this may not be financially feasible for the next couple of years, especially since my goals run the gamut from visiting gastronomically celebrated cities to taking culinary classes... but mark my words, I'm not going to let these aspirations die.

        Until next time, enjoy!
        MARGARET

        P.S. I've been dying to use this bowl that I got from Anthropologie for Christmas, and now that I have, I can say that it is nothing short of awesome... so if you're on the fence, you should get it! It's the perfect size for salads, soups, or cereal.

        Thursday, June 23, 2011

        Your Birthday Sucks!


        My coworker constantly laments her age. As a result I wanted to highlight it on her birthday. Be glad if you're not friends with me. ;-) To do this project, all you'll need is a colorful little box (I used a Kate Spade bracelet box), a piece of Styrofoam, some scissors to cut the foam to fit your box, lollipops,  a card, a Sharpie, and a good sense of humor.

        Enjoy!

        Monday, June 20, 2011

        To Papa


        FOR FATHER'S DAY this year, I decided to bring some cheer to an ordinary office window by creating 3-dimensional cut-outs of hot air balloons and clouds. They're so easy to make (which I'm all about) and melt even the iciest of hearts... so basically anyone will enjoy this unless they lack a heart. ;-)

        Though we've had lots of misunderstandings and disagreements in our history and most definitely will in our future, my dad is one of the few people who always does what he thinks is best for me, answers my phone calls eagerly and tries his hardest to be my guiding light through difficult times. Love you forever and a day, Papa!

        Tuesday, May 31, 2011

        Summer 2011

        1. go on roadtrips to quaint little towns, only when gas is cheap of course.
        2. plant watermelon.
        3. take night strolls.
        4. discover new bike paths and burn my muffin tops.
        5. say no to pants (i also refer to them as leg prison).
        6. exhaust our ice cream maker.
        7. bring home fresh corn from the farmer's market.
        8. take polaroid pictures to document it all! :-)

        What are your plans for Summer (if it ever arrives)?

          Monday, May 9, 2011

          For My Mother Theresa

          YEAR-ROUND APPRECIATION is something my mom deserves simply because she is an amazing person. She amazes me with her resilience, kindness, optimism and her incredible ability to nag non-stop. I'm also amazed by how silly she can beshe sends text messages to my dad asking, "Do you want a snake?" because she thinks that's how you spell 'snack'. Yep, she can diffuse any situation with her silliness.

          She also bears an uncanny similarity to Mother Theresa in every almost every way: she is way too nice and has superhuman powers when it comes to multi-tasking (working 9 hour days, cooking, cleaning, laundry, taking her kids to doctor appointments/school/visit friends, taking my grandparents places, grocery shopping)... umm, is she a saint?

          My sister and I had the idea of making casual breakfast foods in dressed-up ways. I couldn't think of anything too visually spectacular, but with the idea of daisy eggs in toast, I'd say breakfast foods vaulted from forlorn to pretty darn fantastic in my book.

          On the menu for Momma, there was...

            DAISY EGGS IN TOAST


            Directions:
            1. Using a flower-shaped cookie cutter, cut out the center of a slice of bread.
            2. Toast the bread, then fit cookie cutter coated with cooking spray in the center of the bread. 
            3. Crack an egg into cutter. Cover your pan and cook for 2-3 minutes, then let cool and remove cookie cutter. (You can use a toothpick to loosen the egg if you have problems with sticking.)


            ROASTED FENNEL AND CITRUS SALAD (my sister's recipe)

            Salad Ingredients:
            • 2 bulbs of fennel, cut into 1/2 inch strips and roasted
            • 2 oranges, cut into wedges without pith
            • 1/2 red onion, diced
            • 4 cups mix of spring greens and spinach
            • 6 leaves mint
            • 1/2 cup walnuts, *optional
            Vinaigrette Ingredients:
            • 1/4 cup juice from orange
            • 1/4 cup olive oil
            • 1/8 cup balsamic vinegar
             

            Directions:
            1. Trim the fennel bulb. Cut into slices about 1/2 inch thick. 
            2. Roast fennel at 350° for 20-30 min. until translucent and caramelized.
            3. Remove the skin of the oranges with a sharp knife, taking care to remove all the white pith from the fruit. Cut out the orange sections and squeeze the orange juice for the vinaigrette.
            4. Slice the onion and mint into ribbons, and scatter walnuts on top of combined ingredients. 
            5. Whisk olive oil and vinegar into orange juice.
            6. Drizzle vinaigrette on salad and serve.

            LEMON SOUFFLE

            Ingredients:
            • 8 lemons
            • 3 large eggs
            • 1/2 cup granulated sugar
            • 2 tablespoons all-purpose flour


            Directions:
            1. Cut 1/5 of the tip of a lemon off and make sure it sits level. Do the same with the top of each lemon, and save the tops for caps.
            2. Scoop out the pulp of the lemon with a melon baller or spoon, and squeeze the juice for later. Repeat with all lemons. Put shells on a sheet lined with parchment paper and place on baking sheet.
            3. Separate egg yolks and whites. Combine egg yolks, sugar, flour and 1/4 cup lemon juice in a heat-proof bowl. Whisk the mixture on a medium speed for about 3 minutes until it becomes a light yellow. Using a double boiler, beat for 5-7 minutes until thick. Take the bowl off the double boiler and beat on a medium speed until cool (8-10 minutes).
            4. Combine egg whites and 1/4 cup sugar in a new bowl. Using a double boiler, stir until the sugar is dissolved. Remove the bowl and beat on low speed until very frothy. Gradually use a faster speed until the meringue holds soft peaks. Do this for about 2-3 minutes and do not overbeat.    
            5. Whisk 1/3 of the meringue from Step 4 into the mixture from Step 3. Pour this mixture into the lemon shells. Heat oven to 350°, and put sheet into oven. Remove from the oven after 10-15 minutes when meringue has puffed up and is slightly golden. Put caps on each lemon and serve immediately!


            Happy Mother's Day!
            XO // MARGARET

            Monday, April 25, 2011

            Monday Makeover: Mousepads!

            GETTING CRAFTY 
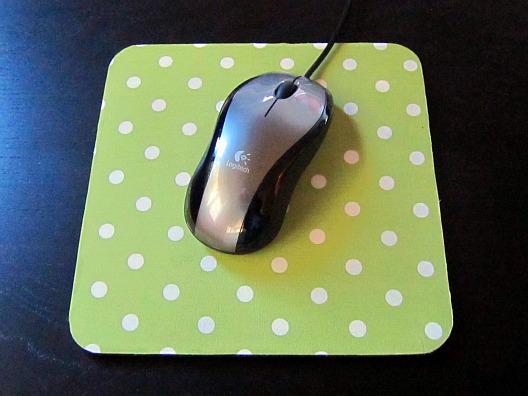
is one of my favorite things to do on the weekend when it's bleak and weary outside. My company moved to a new office recently and everything was so shiny+new that my mousepad looked weathered in comparison. I got it over 10 years when I won an art contest so it was definitely time to update it!

            Here's what you need to get started on your own:

            MATERIALS
            - An old mouse pad (Ikea has some good basic ones for just $1 each.)
            - Fabric*
            - Fray check*
            - Heat n' Bond*
            *all available from your local craft store.

            DIRECTIONS
            1. Trace the mousepad onto your fabric, and cut a 1/2 inch of extra fabric around the traced shape.
            2. Put the side of the fabric with the print face down, and put Heat n' Bond on it with the paper side up.
            3. Iron for 10 seconds until bonded and remove paper backing from fabric when done.
            4. Place fabric on mouse pad right side up and iron over fabric until bonded.
            5. Trim extra fabric with good scissors and use Fray Check to make sure there are no loose threads.

            ... And voilà! Five steps later you have a pretty cheap, pretty easy, and pretty new mousepad.


            From drab to fab.

            Have fun!
            Margaret

            Tuesday, March 22, 2011

            Holy Breakfast Pizza

            RATHER THAN try to explain my penchant for breakfast, I'll just let the ingredients do the talking: veggie bacon strips which I lovingly refer to as fakeon (pronounced fay-ken),  a healthy handful of sliced tomatoes, a grip of fresh flat-leaf parsley, a sprinkling of chives, shallots, and onions, topped with a dusting of Parmesan cheese and... eggs?

            Yes, eggs on a pizza. The result? Only one of the best pizzas I have ever had in my life. This recipe kicks all other "breakfast pizzas" to the curbtypically when someone says "breakfast pizza," I envision cold, soggy slices of pizza from the night before, but not this one. Getting a bite of eggs with bacon is sheer genius!


            DIRECTIONS

            1. Roll dough out into a 12" diameter. You can make your own, or you can buy premade dough (which is what I did).
            2. Assemble pizza with thinly sliced onions, shallots, fake bacon, tomatoes, and cheese. You can brush some oil on the top if you're worried about burning.
            3. Crack three eggs onto the pizza (You can break the yolk if you prefer,so that the egg isn't concentrated in one area--I definitely like it spread out), and bake at 375° for about 20-25 minutes, or until golden brown.
            4. Remove the pizza from the oven, sprinkling minced chives and parsley on top.

            Adapted from The New York Times.

            xo,
            margaret

            Monday, March 14, 2011

            The Pineapple Purse

            MY WEAKNESS for bags that resemble food and/or are sparkly  is pretty transparent, even to people who have only known me for a few months. Fortunately my raccoon-like nature is not lost upon them and makes gift-hunting for me a cinchmy presents usually involve some sort of shiny bauble or tasty morsel, and if I'm lucky, a combination of the two.

            As you can imagine, I was pretty thrilled to see that I am not alone: I stumbled upon this fortune cookie coin purse made out of recycled leather last week, and most recently, this pineapple coin purse from Kate Spade.

             So shiny. So delicious. I want.

            Available from katepsade.com for $95, this tropical sparkler is oh-so-cute. Did I also mention it is ready for purchase? My birthday is in November so you have a few months to save up. ;-)

            xo,
            margaret

            Wednesday, March 9, 2011

            Mini Golf

            BEFORE I MET him, I had already heard stories about Nick's uncle, one of which I had to see to believe. Appropriately nicknamed "Tiger" as in Tiger Woods, he had already proven time and time again that he was a Wii Golf champion. I was most disbelieving of the dessert fiend rumor until it was confirmed one night when he gobbled up a plate of at least 30 mini lemon drizzles.

            Using this knowledge of his lemon fanaticism and unrivaled golf acumen, I decided to whip up some luxuriously rich lemon cupcakes modeled after a golf course.

            The finished product was awesomewith green sanding sugar for the "grass", mini jawbreakers for golf balls, and golf flags made from yellow construction paper that I cut out and glued to toothpicks. I also used crushed graham crackers for the bunkers, but crushed vanilla wafers would work just as well.

            Anyone want to play mini golf? ;-)

            {Tart Lemon Cupcakes}

            Difficulty Level: Easy
            Time: 35 minutes preparation, 20-25 minutes baking
            Yields: 15 regular-sized cupcakes

            INGREDIENTS

            • 1/2 cup butter
            • 1 cup white sugar
            • 2 eggs
            • 1/2 teaspoon vanilla extract
            • 1/2 teaspoon lemon zest
            • 2 tablespoons lemon juice
            • 1 3/4 cup all-purpose flour
            • 1/2 teaspoon baking soda
            • 1/4 teaspoon baking powder
            • 1/4 teaspoon salt
            • 1 cup sour cream
            • mini jawbreakers

            DIRECTIONS

            Combine slightly softened butter with sugar, and cream together. Add eggs one at a time. Mix in vanilla extract, lemon zest, and lemon juice. Combine all dry ingredients. Alternately add dry ingredients and sour cream into mixture. Bake at 375° F for 25-30 minutes. Remove, cool for 10 minutes, frost, and get ready for "tea time"!


            xo, margaret