Showing posts with label cookie. Show all posts

Friday, December 19, 2014

Melted Snowmen Cookies

O THER THAN getting to see my family in Los Angeles, this hasn't been the white Christmas I've been dreaming of.  My grandma was rushed to the emergency room and we were told she would not make it past a week.  Since being admitted to the hospital her condition has stabilized, but it's been a sleepless week for everyone involved and it's been difficult keeping our spirits up.  My grandpa also was rushed to the hospital today and we are waiting to hear the prognosis.  One of my worst fears in life is feeling helpless when the people I love are not well.

I try to remind myself that there are many silver linings: this year has been a really great one in a lot of ways.  My friends have proven time and time again that they are there to help me back up when I've fallen, which is one of those things in life you don't really seem to notice until you're down.  I met my boyfriend who is someone I truly feel is my partner and makes me smile just because of who he is.  He is the kind of person who would laugh at me when I call to tell him I've locked myself out of my car but drop everything to help me get in.  I feel so fortunate to have met him.  This year I also got to explore China with my family, and my grandparents who are all over 90 years in age have lived really complete, fulfilled, lives.  The last couple of years I felt a rift growing between me and my parents; this year I feel like that gap has been partially bridged though there is still a distance.  I make every effort to see things through an objective lens: a situation is never really good or bad, our attitude is what makes it so.

Before my sister and I rushed to LA, we had made these festive sugar cookies that I planned on giving out to friends.  They're really easy to make and taste great too.


MELTED SNOWMEN COOKIES
Yields 30 cookies

COOKIE INGREDIENTS
  •  3/4 cup softened butter
  •  1 cup white sugar
  •  2 eggs
  •  1/2 tsp vanilla extract
  •  2 1/2 cups all-purpose flour
  •  1 tsp baking powder
  •  1/2 tsp salt

COOKIE DIRECTIONS

  1. In a large bowl, cream together butter and sugar until consistency is smooth. Beat in eggs and vanilla extract. Stir in dry ingredients: flour, baking powder, and salt. 
  2. Cover and chill dough for at least one hour (or overnight).
  3. Preheat oven to 400° F.  Roll out dough on floured surface 1/3" thick.  Cut into shapes with any cookie cutter or cup. 
  4. Bake 6 - 8 minutes in preheated oven. Cool completely.
  5. Once cookies are cool, spread the icing on each cookie and allow to dry (see below for homemade icing instructions).
  6. For the 'head' of the snowman, cut a marshmallow in half and microwave them on a plate for 15-20 seconds or as soon as the marshmallow starts to puff up.  Remove and position them on the cookie.
  7. Using colored icing, decorate the faces on the marshmallow and the arms and buttons on the snowman's body.

ICING INGREDIENTS
  • 1 cup confectioners' sugar 
  • 2 tsp milk
  • 2 tsp light corn syrup 
  • 1/4 tsp vanilla extract  

ICING DIRECTIONS
  1. Stir together confectioners' sugar and milk until smooth. 
  2. Beat in corn syrup and almond extract until icing is smooth and glossy.  Add corn syrup to thin the icing if it's too thick.  When you put the icing on the cookie, allow icing to firm up and go from a glossy finish to matte.  This will take several hours.

Saturday, October 26, 2013

Tasty Lady Finger Cookies

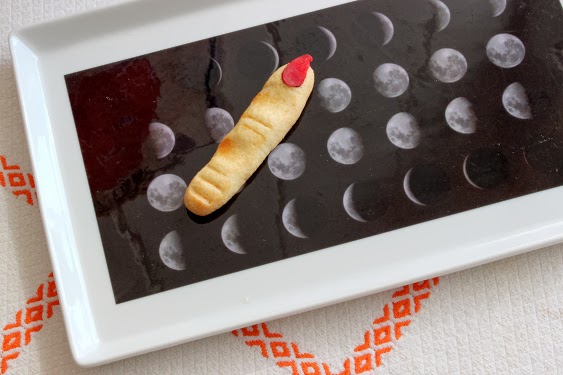
PART OF WHY Halloween is my favorite holiday is that it's the one occasion where dress-up and disguise are socially acceptable, and if I can sound totally scary for a minute, the one day "evil" is allowed to prevail over "good".  In preparation for Halloween parties galore, my friend Zhanna and I spent our Friday night sipping dark chocolate martinis and moonlighting as a finger-making factory.

Check these fancy phalanges out:


Care to feast on some finger foods, ghouls and boys?


LADY FINGER COOKIES
Yields 30 cookies

INGREDIENTS
  • 30 almond slices
  • Red food coloring
  • 2 eggs
  • 1/4 teaspoon pure vanilla extract
  • 1 stick unsalted butter, slightly softened
  • 1/2 cup powdered sugar
  • 5 tablespoons granulated sugar
  • Pinch of salt
  • 1 2/3 cups all-purpose flour

DIRECTIONS
  1. Dispense 10 drops of red food coloring into a shallow bowl. Color your almonds by letting them submerge in the food coloring. Set aside and let dry.
  2. Using an electric mixer fitted with the paddle attachment, combine butter, powdered sugar, granulated sugar, and salt. Add one egg and the yolk of another egg, and beat until smooth. Add flour to the mixture and combine on low until dough forms. Wrap this in plastic and chill in the refrigerator until firm (roughly 35 minutes).
  3. Take the dough out of the fridge and preheat your oven to 350°.
  4. Line your cookie sheet with parchment paper and then form 30 balls with dough. Make each ball into a finger shape, press down on two places to form the knuckles, then score each knuckle with a knife.
  5. Brush egg white onto the fingers and position the almonds on the fingers.
  6. Bake for 12-15 minutes.


This moon phases cocktail plate is wicked cool.

Have a great Halloween, everyone!  Until we eat again...

Monday, June 17, 2013

Keroppi Green Tea Cookies

R
EMEMBER WHEN kids were crazy for Keroppi?  Neither do I.  It seems that no Sanrio character has enjoyed as much success as Hello Kitty, especially with the help of celebrities like Paris Hilton and Mariah Carey who have catapulted the feline into the limelight, eclipsing all the other adorable characters.

I personally was partial to Pochacco because I love dogs.  I was never obsessed, but then there are people like my friend Victor.  Victor loves Keroppi; he probably loves Keroppi more than he loves most people.  In fact he has a collection of plush Keroppis, each of which has its own name (obviously), and remain in their individual dust bags to ensure continued cleanliness and longevity.  I don't know when Victor's Keroppi mania started but he would murder for Keroppi if an animated frog could issue a command to kill.  If that's not love (and/or borderline psychosis), I don't know what is.

I came across a Keroppi cookie from Jen of Tiny Urban Kitchen when I was looking for something to get Victor for his birthday.  I felt like I struck gold.  I mean seriously, after seeing these cookies, are you not in love with Keroppi too?


KEROPPI GREEN TEA COOKIES (adapted from Tiny Urban Kitchen)
Makes 2 dozen cookies, prep time: 2 hours (not including time in fridge), bake time: 8 minutes.

INGREDIENTS
  • 1 1/2 cups all purpose flour
  • 3/4 tsp baking powder
  • 1/4 tsp salt
  • 1 1/4 sticks softened butter
  • 1/2 cup sugar
  • 1 egg
  • 1/2 tbsp milk
  • 3/4 tsp vanilla extract
  • 1 tbsp matcha powder
  • Rainbow Chip Crunch sprinkles
  • pink or red food coloring

DIRECTIONS

1. Mix flour, baking powder, and salt in one bowl.  In a separate bowl blend sugar and butter until smooth.  Add egg, milk, and vanilla into this bowl and mix.  Then add the flour mixture slowly into the sugar and butter mixture until everything is smooth.

2. Separate the dough into 2 sections, with one section roughly twice as large as the other section.  Mix matcha powder into the larger section until dough is consistent in color.   Roll each section out to about 1/4" thickness, place between non-stick paper, and refrigerate until firm (30 minutes to an hour).

3. How to assemble a cookie: Use a shot glass to cut Keroppi bodies out of the green dough.  Then shape the dough a little, as Keroppi's body is more oblong than circular.  I used cake piping tips to cut eyes out of the "white" dough, and again to cut out the green dough where his eyes go.  Fit the eyes into the cut out face, and stick Rainbow Chip crunch sprinkles for his pupils.  Use a toothpick to imprint Keroppi's smile. Finally with some of the white dough, use pink or red food coloring for Keroppi's noteable pink cheeks.

4. Preheat oven to 375° and bake for approximately 8 minutes.


Enjoy! :)


Tuesday, May 15, 2012

Matcha Green Tea Cookies

B
ATTLING THE DESIRE to gorge on sweets has become a bit problematic for me lately. Every meal has felt incomplete unless it ended with dessert. For instance, I made some green tea cookies, and as soon as they had cooled, I ate 6 of them, one after the other. The takeaway from this is that I am not to be left unattended with cookies.

Since I am embracing this physical dependence on sugar, or at least attempting to make a gradual departure from it, I made semi-healthy green tea cookies. Green tea has antioxidants, you can look it up. ;-) The first step to all of this is making little matcha chip morsels, which is so easy a task you will be dreaming of all sorts of infusions.


MATCHA CHIP INGREDIENTS
  • 2 1/2 cups white chocolate chips (I like Ghiradelli)
  • 2 tbsn. matcha powder

DIRECTIONS
  1. Melt your white chocolate using the double boiler method (i.e. place a bowl over a pot of hot water, making sure to form an airtight seal). Once the white chocolate shows the first signs of melting, reduce the heat and stir until smooth.
  2. Add 2 tablespoons green tea powder. You can purchase food grade matcha powder online. Otherwise it becomes very expensive.
  3. Transfer everything into a bag and pipe chips onto a piece of aluminum foil. Put them in the freezer for about 35 minutes or until hardened.


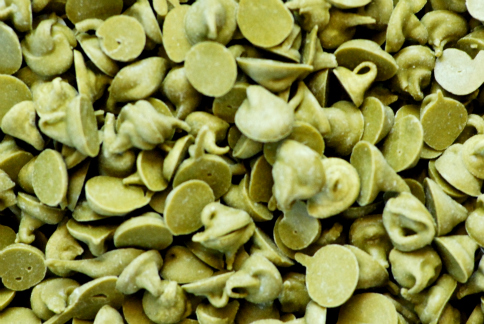
Matcha Chips


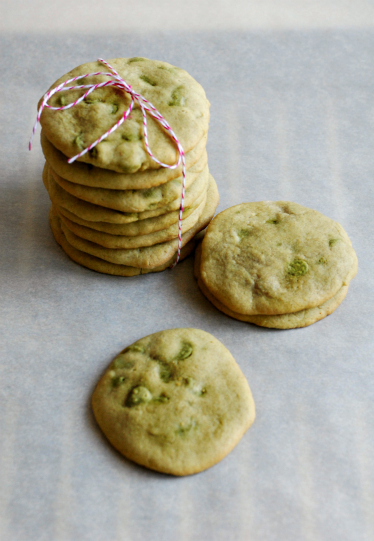
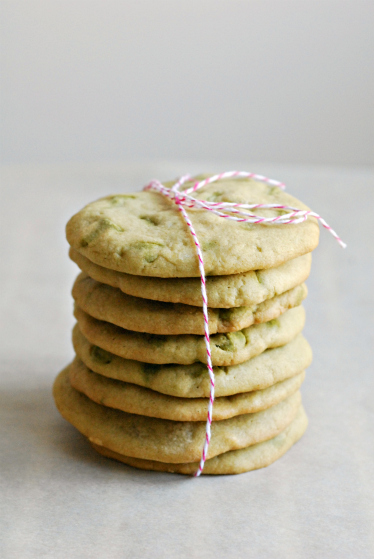
Piles of cookies, waiting to be devoured.


COOKIE INGREDIENTS
  • 2 1/2 cups flour
  • 1 tsp. baking soda
  • 1/2 tsp. baking powder
  • 1 1/2 cups granulated sugar
  • 1/4 tsp. salt
  • 3/4 cup unsalted butter (softened)
  • 1/4 cup green tea (brewed 1 tablespoon green tea to 1/4 cup water)
  • 1 egg
  • 1 tsp. vanilla
  • 2 1/2 cups matcha chips

DIRECTIONS
  1. Preheat the oven to 325 degrees F. Grease cookie sheets or line with parchment paper.
  2. Combine sifted dry ingredients (flour, baking soda, baking powder, salt). Beat butter and sugar until well combined, then egg, vanilla, and green tea until light and creamy.
  3. Using a wooden spoon, stir matcha chips into dough.
  4. Place cookie dough on sheet (with cookie dough balls having 1" diameter) about 1" apart. For pillowy cookies, leave as is. For slightly flatter cookies, press down with your palm.
  5. Bake for 12-15 minutes or until cookies are golden brown. Let cool for 5 minutes before serving.


What other teas would you like to try this with?

Enjoy!
Margaret


Thursday, August 18, 2011

Ooo-La-Lingerie Cookies

BACHELORETTE PARTIES can sometimes mean a never-ending supply of tequila shots, an obscene amount of phallic-shaped party favors, and stuffing dollar bills into a police officer's rippling banana hammock. Fortunately the bride-to-be wanted a low-profile trip to Napa to get some R&R and take time away from the stresses of wedding planning.

I couldn't attend so I thought it would be nice to send her some bachelorette-appropriate goodies. I enlisted Sherri from Sherri's Sweet Treats (Her cupcakes are unreal—fan her Facebook page!) to make some lingerie cookies with me. We used heart-shaped sugar cookies (there are so many types of cookies you can make with them!) royal icing, pearls and non-pareils for all the bows and frills.


Photo credit unknown.

We didn't get a chance to snap any pictures of the ones we made, but it takes a little bit of skilled handiwork to get these looking pretty as the ones pictured above. As Sherri and I both discovered, it gets pretty tiring applying pearls individually. We learned some useful lessons along the way:

  • Line your cookie with the shape of whatever you're working on. As a reference, the icing for the outline needs to have a toothpaste-like consistency.
  • Flood your cookie with a thinner, runnier icing than the icing used in the previous step. Use a toothpick to fill in the lines if necessary, or gently shake the cookie to get the icing to settle.
  • Use tweezers to apply the pearls evenly to your cookie while icing is still wet.
  • Start off with just a few colors, and do everything methodically (i.e. line all cookies first, let dry, flood to fill cookie, then decorate with other colors). Royal icing dries fairly quickly so it can be chaotic trying to use a ton of colors without knowing your game plan.
  • Keep a spray bottle handy for spraying into your royal icing to thin (If you don't believe me, then take her word for it! Sweet Sugar Belle, the cookie-decorating goddess, swears by this.)

    Please feel free to leave suggestions you may have; I'd love to hear your input. :)

    Thanks,
    Margaret

    Monday, February 28, 2011

    Food For Change

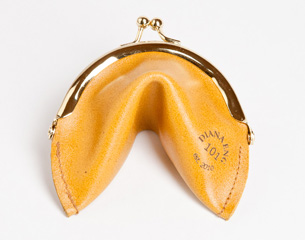
    I am in love! Designed by Diana Eng, these handmade fortune cookie coin purses are created from 100% recycled leather (yay for recycling!) and each purse has a unique number on it so you can track its origin. A little pricey, but cute as can be, and definitely a great gift idea, as they come with a special message inside!  Reminds me of the ones Nick made me. :-) Available at dianaeng.com for $65.


    Sunday, December 26, 2010

    12 Cookies & Crafts of Christmas

    Q BJECTIVELY SPEAKING, Christmas is the one occasion where parties and cookies will be measured against everyone's fondest childhood memories. OK, maybe I should lighten up on the melodrama, but it's hard to deny the headache that present-hunting or baking can sometimes elicit. Stuff your face and your stockings with my favorite DIY Christmas cookies and crafts.

    1. Cinnamon Tree 
    A great use of cinnamon besides for adding flavor is to use the bark! What you'll need: cinnamon sticks, hot glue gun, twine, mini stars (you can find these wherever they carry scrapbook making supplies), three buttons, plaid fabric, three consecutively long Evergreen leaves. I would suggest cutting approximately 1.5", 2", 2.5" pieces.


    2. Snickerdoodles
    Cinnamon is also used in so many Christmas classics, my favorite being snickerdoodles! This recipe makes the most pillowy golden brown cookies.

    Ingredients
    • 3 cups all-purpose flour 
    • 2 teaspoons baking powder 
    • 1/2 tsp. salt 
    • 2 eggs 
    • 2 teaspoons cinnamon and 2 teaspoons sugar
    • 1 1/2 cups white sugar 
    • 2 sticks unsalted butter at room temperature  
    1. Mix together flour, baking powder, and salt. 
    2. Mix butter and 1 1/2 cups of sugar in separate bowl, then add 2 eggs and flour mixture. 
    3. Form 18-20 balls, combine cinnamon and 2 teaspoons sugar and use to coat dough balls.
    4. Leave about 3" of space between cookies, because they spread! Bake at 350° for 13 minutes.


    3.  Santa Gift Tags
    These are a cinch to make and therefore a perfect project to do with kids. Draw/paint personalized Santa faces on card stock/watercolor paper. Cut the faces out, making sure to leave room for the beard. Tie together short pieces of white yarn approximately 1.5" long with another piece of yarn, and tape to the back of Santa's face.


    4. Cool Jewel Cubes
    Bling your drink with these dazzling ice cubes! I've already made Cranberry "garnets", "emeralds" (a drop of green food coloring does the trick), Apple "Topazes", and "Diamonds" (just water!)... the possibilities are endless. You can find the ice cube mold by Fred here. 


    5. Snowman Donuts
    I found these donut hole snowmen over at partyperfectblog.blogspot.com. They didn't mention what they used for the snowman's face, but I used some brownie crunch sprinkles for the eyes and mouth. For the "carrot" nose, I used some orange tootsie rolls and shaped them into Frosty's nose!


    6. Doily Snowflakes
    I doubt it was an accident that doilies resemble snowflakes. Look around the house for any crocheted doilies you have stored away, or you can create your own. Paper doilies hang more elegantly, but you could use crocheted doilies for a bunting that would add some charm to a bare table or wall. I needed last minute bags for presents, so I took out my scissors and beautified some ordinary red bags.


    7. Nutty Reindeer Ornament
    I'm pretty "fawned" of these darling deer ornaments I help put on the tree this year. ;-) Gather some unshelled walnuts, peanuts, pom poms, and googly eyes for this ornament. Add a festive bunch of fabric between the "antlers" and you're all set!


    8. Chocolate Crinkles
    Chocolate lovers won't be able to resist this one. It's moist, gooey, and bursting with flavor without being too strong. The snowy white confectioners' sugar provides the perfect winter touch too.

    Ingredients
    • 4 ounces of semisweet chocolate, melted using a double boiler.
    • 1/4 cup unsweetened cocoa powder
    • 1 cup brown sugar
    • 1 egg
    • 1 teaspoon baking powder
    • 1/2 cup all-purpose flour
    • 1/8 teaspoon salt
    • 1/2 stick unsalted butter
    • 1/2 teaspoon vanilla extract
    • splash of milk
    • 1/2 cup confectioners' sugar

      1. Use a double boiler to melt the chocolate.
      2. Combine flour, cocoa powder, baking powder and salt in one bowl.3. Mix butter and sugar, then adding in eggs, vanilla, and melted chocolate, then flour and milk.
      4. Refrigerate dough until firm, which takes 1-2 hours depending on the settings of your fridge.
      5. Form about 20 balls, and roll in confectioners' sugar.
      6. Turn oven to 350° and bake for 13-15 minutes.


      9. Pasta Angel Ornaments
      Behold, pasta-haired angels... a twist on your angel-hair pasta! What you'll need: wooden bead for the angel's head, Rigatoni for the body, Bowtie aka Farfalle pasta for the wings, Elbow macaroni for the arms, Acini de pepe for the hair, clear glue, hot glue gun, white spray paint, gold glitter, string, and a fine gold pen to draw on your angel's face.


      10. Pumpkin Cookies
      Why limit pumpkin to Halloween or Thanksgiving? These pumpkin cookies adapted from Martha Stewart's Cookies book have a vanilla-ey icing and you can top them with these gingerbread men that I gave away here.

      Ingredients
          •    1 1/2 cups all-purpose flour
          •    1/2 teaspoon baking powder
          •    1/2 teaspoon baking soda
          •    1/2 teaspoon ginger
          •    3/8 teaspoon nutmeg
          •    1/2 stick unsalted butter
          •    1 cup brown sugar
          •    1 egg
          •    3/4 cup canned pumpkin
          •    1/2 cup evaporated milk
          •    1/2 teaspoon vanilla extract

      *For the icing, use 2 cups confectioners' sugar, 1/2 stick unsalted butter, 1/8 cup evaporated milk,  and 1 teaspoon vanilla extract.
      1. Combine flour, baking powder, baking soda, salt, cinnamon, ginger, and nutmeg.
      2. Mix butter and sugar until fluffy, then add eggs, then add pumpkin, evaporated milk, and vanilla. Lastly, add flour.
      3. Bake cookies for 12 minutes at 375°.


      11. Claus Cookies
      Sugar cookies are a must-have for Christmas! My favorite holiday treat are these Claus Cookies. Using egg paint with a drop of red food coloring, you can opt for a lighter treat than with icing.  And you know what this means--more cookies! A win win situation. You can decorate these with white nonpareils, snowflakes, coconut shavings, icing, or whatever else you have on hand.


      12. Petit Four Presents
      These petit fours are--quite literally--Christmas presents for your mouth! I didn't have my camera  handy when I made mine, but here are some fabulous looking ones from aperfect-bite.blogspot.com. Check her out! You can use Wilton Fondant with Oreo cakesters and it takes no time at all.


      Happy Holidays, everyone!
      XO, MARGARET

      Monday, November 15, 2010

      This with That: Dessert with Tea, Part I

      MARMALADE COOKIES, Muenster cheese, and fresh fruit--these are just a few of the things I have discovered pair perfectly with tea. Over the last year or so, Nicholas has inundated me with a data deluge of tea trivia. What I've taken away from talking about and drinking tea is that each person may experience something slightly different or perceive something that another may not--and that's totally okay!

      In my mind, this makes pairing food with tea less of a science and more of an art form that is completely dependent on the taster's palate and the extent to which they are willing to experiment. Over the next few weeks I hope to share what I've found to be tasty tea and dessert couplings with you.


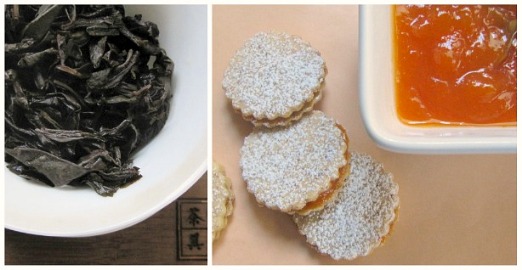
      Apricot cookies with Oolong Tea


      Apricot Cookie Ingredients:
      • 1/2 cup almond flour
      • 1/2 cup all-purpose flour
      • 1/4 cup cornstarch
      • 1/2 cup room temperature butter
      • 1/2 teaspoon salt
      • 1/4 cup baker's sugar
      • confectioners' sugar to dust cookies
      • grated zest of 1 medium-sized lemon, and a tablespoon of lemon juice to the apricot jam
      • apricot jam

      Directions:
      1. Mix dry ingredients except for sugar in a medium bowl (flour, salt, cornstarch) and mix wet ingredients separately (butter, lemon zest, lemon juice, and sugar). Refrigerate the dough for 45 minutes and roll out to 1/4" thick on a piece of wax or parchment paper. Freeze this for 10 minutes after placing on a baking sheet.
      2. Cut out cookies and bake for 9-10 minutes.
      3. After the cookies have cooled, spread a bit of apricot jam (feel free to add lemon juice) on a cookie and sandwich. Sprinkle confectioners' sugar on a cookie and eat!
      Note: This recipe should make 18-20 cookies. The cookies themselves will not be very sweet, so you can add more sugar, but I like them to be relatively unsweetened; that way the jam packs more of a punch. You can also vary the amount of lemon juice you squeeze into the mix; I favor more lemon in the cookie and less lemon in the apricot jam.

      And now onto one of my favorite types of tea! I have tried many types of Oolong tea and have found some commonalities as well as striking differences between the two. The Chinese oolongs taste very earthy and sweet to me, whereas Taiwanese oolongs are not as heavily oxidized and therefore richer, creamier, more flowery. I would even say that they are mildly vegetal. Both Chinese and Taiwanese oolongs initially are very strong and can be bitter, but have a smooth and much milder finish with a very sweet aftertaste.

      Because of this, either type of Oolong goes very well with the cookies. The lemony citrus bite of the cookie also highlights the floral notes of the tea. I think the lightness of Oolong lends well to any cookie with a sharp flavor, which makes the Apricot filled lemon cookie and Oolong combination a match made in heaven.

      Drop me a line in the comments form; I would love to hear what you think!
      XO, MARGARET

      Wednesday, November 10, 2010

      Good Fortune

      IAM THE KIND of person who is seriously underwhelmed by most love songs and re-evaluates friendships if The Notebook is listed as a favorite movie. That's why every year, my boyfriend and I have a hard time establishing our admittedly fuzzy anniversary date. When it comes down to it, we just approximate the date and do something low-key but celebratory.
       
      I don't think any of that makes me unsentimental; I just feel that we appreciate our together-ness everyday. In other words, because I am evil, I ask Nick to do me favors everyday. And he doesn't question them. His response is always something along the lines of, "As you wish," although I think secretly he wishes I would be abducted by a giant, a swordsman, and a Sicilian.

      Princess Bride references aside, I am lucky to have Nick in my life. It would take volumes to describe, but in a few words, Nick's love for me has made the toughest 3 years of my life also the easiest.

      This year I was floored when I came home to Nick in the kitchen making fortune cookies from Martha Stewart's Cookies book. The fortune cookies were almond-y, sweet, slightly soft. The best part yet was that Nick made his own fortunes to put inside! I am not ashamed to say I squealed a little.


      Chef Nicholas hard at work.


      Fortune cookies.

      I got some good ones. ;)


      ♥ MARGARET

      Tuesday, October 26, 2010

      A Trick of a Treat

      YOU MIGHT think the composition of a cookie is not complete unless eggs are present, but let me and everyone who has tried these attest to the deliciousness of eggless cookie dough. I repeat--EGGLESS. For all salmonella-fearing mothers and raw cookie dough lovers, this is a godsend. The recipe is uber easy and child proof:

      • 1 cup all purpose flour
      • 1/4 tsp. salt
      • 3/4 stick softened butter
      • 1/2 cup brown sugar
      • 1/4 cup white sugar
      • 1/4-1/2 tsp. vanilla extract
      • 1 tablespoon milk
      • 1/2-3/4 cup mini semi-sweet chocolate chips

      Combine the flour and salt in one bowl and set it aside. In a larger bowl, beat the butter, sugar, brown sugar, and vanilla extract, and gradually beat in the mixture from the first bowl. After it becomes smooth, fold in chocolate chips. These should make about 20 balls of cookie dough. Place a lolly pop stick in the center and chill until firm (15 minutes or so). Note: Make sure to squeeze the dough onto the stick so that it stays attached to the lolly pop stick; it comes loose very easily otherwise.

      I made "Witch on a Stick" and "Pumpkin Pops" for Halloween this year. Unfortunately, mine came out less than perfect, but that's OK, because ugly pops taste just as good. I've included pictures from the ingenious Bakerella, who loves to do these pops with deliciously moist cake.

      Which witch should I eat?...


      Plump pumpkin pops!
       
      xo,
      Margaret

      Monday, August 9, 2010

      Dogs Are People Too

      O F ALL THE ANIMALS in the world, I think dogs have to be my favorite.  That's why three years ago, when my then-friend now-boyfriend earnestly told me that his childhood aspiration for adulthood was simply "to be a dog," I had a hunch I would fall in love with him.


      Untitled
      Nick as a Native American and his friend wearing Nick's dog suit.


      Pretty funny stuff. Although really, who wouldn't love to be a dog? (Unless you live in a country where people eat them.) Here in the United States at least, dogs are pampered beyond belief, with some celebrity pets getting salon and spa treatments. I've even seen one with its own iPawd. ;-) Oh life is so ruff when you're a canine.

      Anyway, moving along... This weekend I made some tasty treats to pay tribute to my favorite four-legged friends. I also thought Nick would enjoy these while studying for his final exams.

      White Dark
        White and brown sugar cookies.

      Puppy  

      Good luck to all of you studying for exams. Bye for now!
      xo, Margaret

      --
      This post was originally featured on cupcakeandcookie.typepad.com.

      Thursday, August 5, 2010

      Welcome!

      My latest venture, Cupcake & Cookie Confections, is being launched into a full scale bakery, which is awesome! I will not be able to help with the bakery, as I am moving 300 miles away in several months, which is not so awesome. I still, however, will be baking and documenting--whether noticed or not--my trials in the kitchen, which is awesome. So, that's a net gain of awesome.

      In the next few weeks I will be sprucing up the site and piggybacking posts over from another blog so they are viewable here. Thanks for reading!